18 Mother of the Bride Hairstyles Over 50
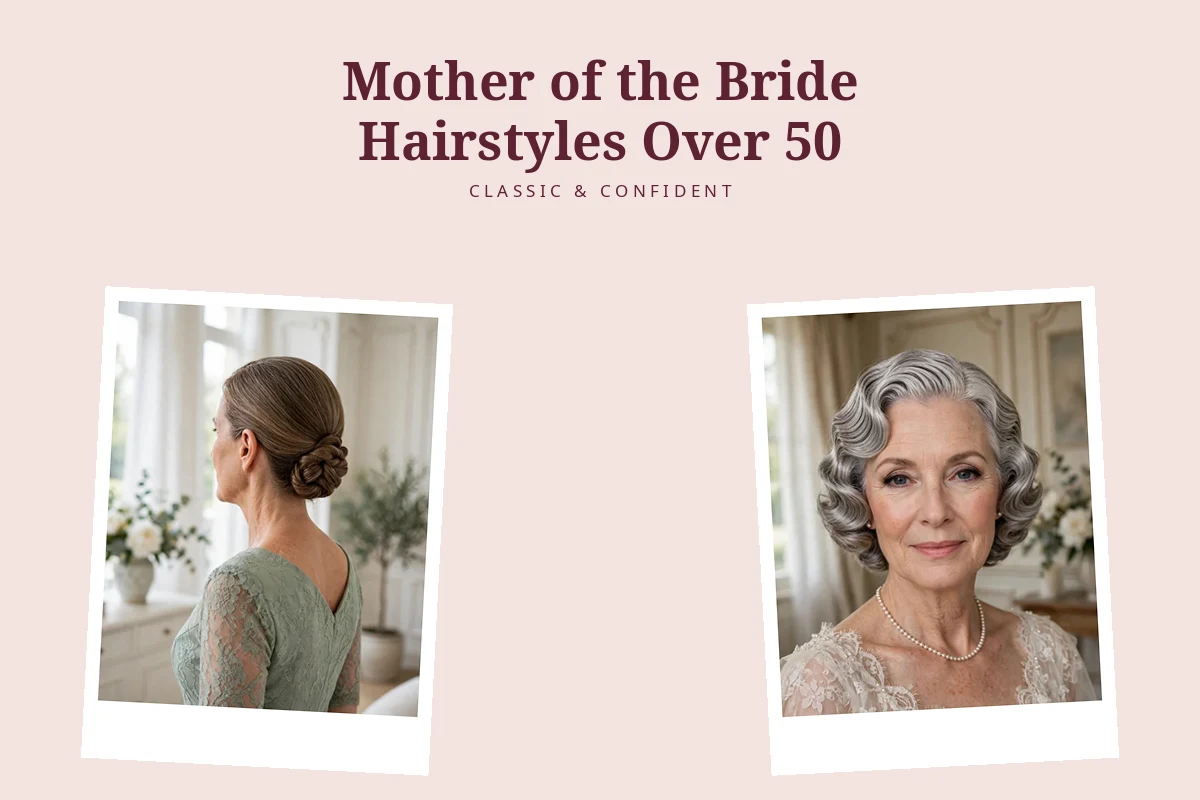
Up, down, or somewhere in between? If you are the mother of the bride and over 50, that is the question every mirror asks you right now. The right one of these mother of the bride hairstyles over 50 does three jobs at once: it photographs beautifully from every angle, it stays put through tears, hugs and a packed dance floor, and it looks like you on your best day — not someone else’s idea of occasion hair.
Below, 18 styles that actually hold, grouped by hair length: six updos, five half-up looks, four worn-down styles and three ways to dress up short hair. Each one tells you the real hold time, the exact words to say to your stylist, and how to style it yourself if you would rather do it at home.
Quick picks
- Need it to last past midnight → Low twisted chignon (#1)
- The neck-lengthening classic → Soft French twist (#2)
- Fine hair that slips out of everything → Braided crown updo (#5)
- Best of both worlds → Half-up with a pearl clip (#9)
- Glossy and camera-ready → Glossy Hollywood waves (#12)
- Short hair, zero fuss → Pixie polished with a jewelled clip (#16)
Contents
How to choose a mother of the bride hairstyle after 50
Your neckline decides first. A bateau or off-the-shoulder neckline wants the hair up or half-up so the line of the dress reads in photos. A high neckline or jacket wants the same, for the opposite reason — hair falling over it looks cluttered. A V-neck or scoop is the one neckline that loves hair worn down, swept over one shoulder. Choose the dress first, then the hair — here are the dresses to match it to.
The weather and the venue. Humidity is the enemy of smooth, worn-down styles: if the ceremony is outdoors in summer, assume your blow-out has a 3-hour life and choose a pinned style instead — twists, braids and chignons hold 8 to 10 hours because the structure, not the product, does the work. An air-conditioned ballroom is where glossy waves and sleek blow-outs survive the whole evening.
Hold versus comfort. Tight does not mean secure — a style pulled drum-tight gives you a headache by hour six and photographs as tension. What actually holds hair is crossed bobby pins (two pins forming an X grip 3 times better than one), a pea-sized amount of texturising powder at the roots, and weight distributed across the head. If a style feels heavy in the trial, it will feel worse at midnight. Pair your style with makeup looks built to last the same hours.
The trial is not optional. Book it 6 to 8 weeks before the wedding — close enough that your haircut is the one you will have, far enough to re-book if you hate it. Bring a photo of your dress neckline and the actual accessories you plan to wear, not similar ones. Then live in the style for 4 hours at home: cook, drive, hug someone. Shorter hair needs a different kind of trial — start from the short haircuts guide so you and your stylist agree on what your length can do.
The 18 styles at a glance
| Style | Hair length | Hold time | Best for |
|---|---|---|---|
| 1. Low twisted chignon | Shoulder+ | 8–10 hrs | All-day security |
| 2. Soft French twist | Medium+ | 8 hrs | Elongating the neck |
| 3. Sleek low bun, side part | Medium+ | 8–10 hrs | Minimalist dresses |
| 4. Loose romantic updo | Medium+ | 6–8 hrs | Softening the jawline |
| 5. Braided crown updo | Medium+ | 10+ hrs | Fine, slippery hair |
| 6. High soft bun, crown volume | Long | 8 hrs | Lifting the face |
| 7. Half-up with soft curls | Medium+ | 6–8 hrs | Showing length |
| 8. Half-up twisted halo | Medium+ | 8 hrs | Adding crown height |
| 9. Half-up with a pearl clip | Medium+ | 6–8 hrs | One-move dressing up |
| 10. Half-up smooth, lifted roots | Medium+ | 6 hrs | Formal, polished |
| 11. Half-up waterfall braid | Medium+ | 8 hrs | Fine hair needing volume |
| 12. Glossy Hollywood waves | Medium–long | 5–6 hrs | Camera-ready glamour |
| 13. Smooth blow-out, flicked ends | Medium | 4–6 hrs | Balancing a narrow jaw |
| 14. Side-swept soft waves | Medium–long | 5 hrs | Detailed necklines |
| 15. Long layers, deep side part | Long | All day | Effortless polish |
| 16. Pixie with a jewelled clip | Short | All day | Short hair, instant occasion |
| 17. Bob tucked and waved | Short–medium | 6–8 hrs | Showing earrings |
| 18. Short crop, finger waves | Short | All day | Vintage glamour |
Updos that hold all day — mother of the bride hairstyles over 50 for long hair
Pinned styles are the workhorses of the wedding day: the structure holds the hair, not the product, so they survive hugs, heat and dancing. All six sit at or below the nape, which keeps the silhouette elegant rather than severe.
1. Low twisted chignon

A twist beats a bun for fine or thinning hair: a bun concentrates the hair’s weight at one anchor point and pulls at the hairline all day, while a twist distributes tension along one continuous roll — nothing drags at the temples. Because the roll sits low with its weight below the anchor, gravity works with it, which is why this is still intact at midnight. The roll should be 8 to 10 cm wide: slim enough to look refined, thick enough to hide 12 to 18 crossed pins. Use light-hold spray, not extra-firm — touchable beats shellacked.
- Length: Shoulder-length or longer
- Hold: 8–10 hours
- Styling time: 15 minutes at home, 30 in the salon
- Face shapes: Oval, heart, square
Ask your stylist for: “A low twisted chignon sitting right at the nape — one rolled twist, not a bun. Cross the pins in pairs so it holds without pulling, leave the front soft, and use 12 to 18 pins, no padding.”
How to style it:
- Gather the hair into a low ponytail at the nape with a clear elastic, then twist the tail firmly in one direction until it starts to coil on itself.
- Wrap the coil flat against the head, tucking the ends under, and pin in crossed pairs — one pin up, the next down, so they lock.
- Soften the front with a comb tail, lifting 1 cm at the part line, and mist with light-hold spray from 25 cm away.
Skip it if your hair is shorter than shoulder length — the roll will not have enough tail to coil cleanly.
Best for: The mother who wants to stop thinking about her hair after the photos — the most secure style on this list.
2. Soft French twist
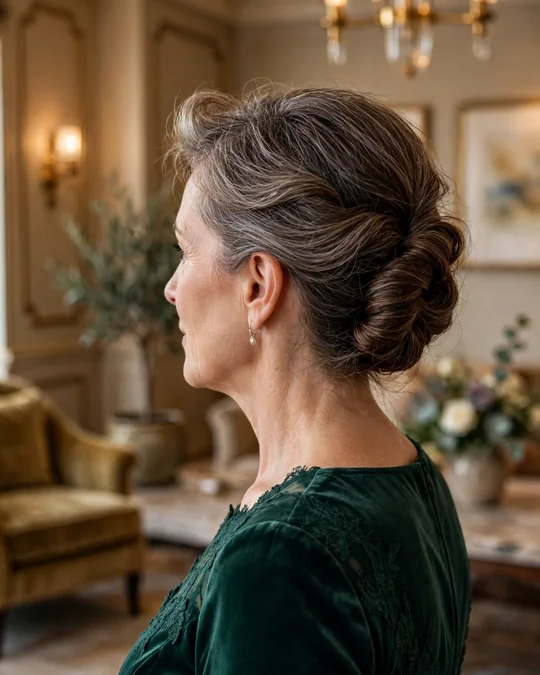
The French twist is a vertical trick: rolling the hair into an upright column adds 5 to 7 cm of visual height behind your profile, which lengthens the neck and lifts the chin in three-quarter shots — the angle every wedding photographer uses. The “soft” part matters after 50: folded loosely with the outer edge eased, it reads as modern; shellacked and pin-straight, it reads as 1987. It also hides thin ends, since every end tucks inside the roll. You need 15 to 20 cm of length at the back for the twist to close cleanly.
- Length: Medium — 15–20 cm at the back
- Hold: 8 hours
- Styling time: 45 minutes in the salon
- Face shapes: Round, square — the height narrows the face
Ask your stylist for: “A soft French twist — fold it loosely, do not shellac it. Ease the outer edge so it looks modern, use 15 to 20 pins, and give me lift at the crown, not a flat top.”
How to style it:
- Sweep all the hair to one side and pin a vertical line of crossed bobby pins up the centre back — the spine the twist folds against.
- Fold the hair back over the pins, tucking the ends inside, and secure the outer edge with downward-pointing pins.
- Ease the outer edge with your fingertips — 2 to 3 mm loose along the roll — so it looks soft, not sculpted.
- Backcomb a 3 cm section at the crown, smooth the top layer over it, and finish with a medium-hold mist.
Skip it if your hair is very thick and heavy — a full twist becomes a bulky column on a petite frame; the low chignon (#1) flatters you more.
Best for: High necklines and jackets — and looking a full 5 cm taller in the group photos.
3. Sleek low bun with a side part

Sleekness is a light trick: hair smoothed flat with a boar-bristle brush and a pea-sized amount of smoothing cream reflects light in one unbroken sheet, and gloss reads as healthy, younger hair in photographs — frizz reads as damage. The deep side part shifts visual weight to one side, breaking facial symmetry, and asymmetry photographs as youth. Together they make the simplest style here one of the most flattering — a 20-minute at-home style that looks like a salon did it.
- Length: Medium — enough to coil a 6 cm bun
- Hold: 8–10 hours
- Styling time: 20 minutes at home
- Face shapes: Oval, oblong — the side part shortens a long face
Ask your stylist for: “A sleek low bun with a deep side part — 5 cm off centre. Smooth everything with a boar brush, coil a small flat bun at the nape, keep every flyaway down. Glossy, not wet-look.”
How to style it:
- Blow-dry smooth with a paddle brush, make a deep 5 cm side part, and brush everything flat in the part’s direction with a boar-bristle brush.
- Work a pea-sized amount of smoothing cream through the mid-lengths, coil a flat bun at the nape, pin in crossed pairs, and press flyaways down.
Skip it if your hairline is fine or receding at the temples — scraped-back sleek exposes exactly that. Try the loose romantic updo (#4) instead.
Best for: Minimalist dresses and architectural necklines, where the hair stays quiet and the dress talks.
4. Loose romantic updo with face-framing pieces

The mechanism here is shadow control. Pulled-back styles can emphasise lost fullness in flash photography; two 5 cm sections left loose at the front break up the light on the jawline, casting tiny soft shadows that blur the jaw’s edge instead of outlining it. The rest goes up loosely, pinned at 45 degrees so the style can move — movement reads as effortless, rigidity as trying too hard. Diagonal pins hold loose hair better than a cloud of hairspray, and you can shake your head at midnight without panic.
- Length: Medium or longer
- Hold: 6–8 hours
- Styling time: 30–40 minutes in the salon
- Face shapes: Square, heart — softens strong jawlines
Ask your stylist for: “A loose romantic updo — pin it softly, not tight, pins at an angle so it can move. Leave two 5 cm face-framing pieces loose, curled away from my face. No scraping back.”
How to style it:
- Curl the whole head with a 32 mm iron, alternating directions, then break the curls up with your fingers.
- Leave the two front sections out, gather the rest loosely at the back, and pin in soft loops — each pin at 45 degrees.
- Curl the front pieces away from the face and finish with flexible-hold spray, so the pieces keep moving.
Skip it if the forecast is humid and the venue is outdoors — loose pieces are the first thing humidity attacks. Choose the braided crown (#5).
Best for: Soft close-up family photos — the most forgiving style here for the over-50 face.
5. Braided crown updo

This is the engineer’s updo. A braid is self-locking — every crossover grips the last — which is why braided styles outlast every other pinned style: 10 hours or more through wind, dancing and emotional speeches. Two Dutch braids distribute the hair’s weight around the crown instead of hanging it from one anchor point, so nothing pulls at the temples — the structural answer for fine, slippery hair. Pancake the braids (tug them gently wider after braiding) and each one looks twice as thick as the hair it contains.
- Length: Medium — 15 cm minimum to braid cleanly
- Hold: 10+ hours
- Styling time: 40 minutes in the salon
- Face shapes: All — crown height flatters every face
Ask your stylist for: “Two Dutch braids from the front hairline, meeting at the back and pinned into a low crown. Pancake them so they look full, keep the tension even with no pulling at my temples. It needs to last 10 hours.”
How to style it:
- Part down the middle and Dutch-braid each side from the hairline toward the nape, keeping the tension even — firm but never yanking.
- Pancake each braid by tugging the outer edges wider, then cross the two tails at the nape and pin flat in opposite directions.
- Tuck the ends under the braid line, pin, and mist once with medium hold — the braid does the work, so go easy on spray.
- Pull 2 mm of hair loose at the hairline all round for softness, so the style never looks severe.
Skip it if you dislike hair pulled away from your face — a crown braid is secure precisely because it sits snug at the hairline.
Best for: Outdoor and summer weddings, windy venues, and fine hair that defeats every other style.
6. High soft bun with volume at the crown
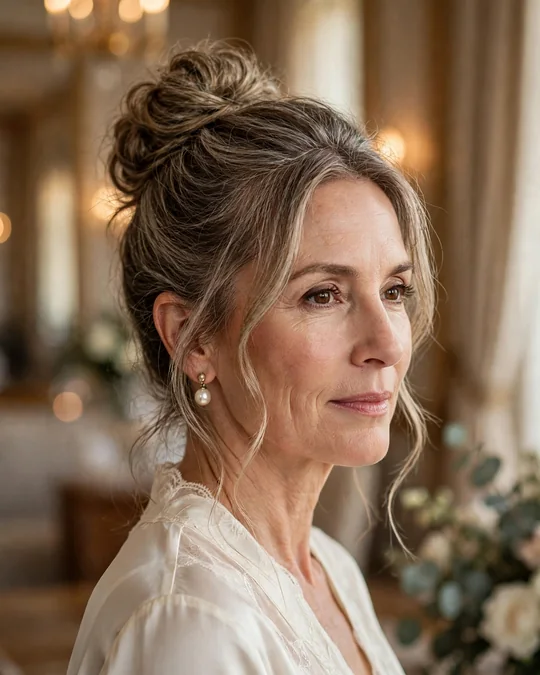
Height is the oldest lifting trick: backcombing 2 to 3 cm sections at the crown adds 3 to 4 cm of real height, and the eye reads upward volume as a lifted face — attention goes up, away from the neck and jawline. The bun sits high but stays soft and loosely coiled, never a ballerina knot; softness keeps a high style elegant after 50 instead of severe. This gives the most lifting effect any hairstyle can, and shows off earrings beautifully.
- Length: Long — needs hair for backcombing plus the bun
- Hold: 8 hours
- Styling time: 30 minutes in the salon
- Face shapes: Round, heart — the height lengthens the face
Ask your stylist for: “A high bun but soft — backcomb the crown for 3 to 4 cm of height, then coil the bun loosely with texture. No tight ballerina bun, no flat top. Crossed pins, not hairspray.”
How to style it:
- Backcomb 2 to 3 cm sections at the crown, then smooth only the top layer over them — the cushion underneath gives the height.
- Gather into a high ponytail, twist loosely, coil into a soft bun and pin in crossed pairs, leaving the coil slightly open and textured.
Skip it if you are very tall or in very high heels — extra crown height on top of extra height throws off proportions in full-length photos.
Best for: Detailed necklines you want fully on show, and anyone wanting maximum lift.
Half-up, half-down
The compromise that is not really a compromise: the top half is secured and structured, the bottom half shows your length. Half-up styles suit medium hair best and photograph with more dimension than fully-up styles.
7. Half-up with soft curls

Two textures in one style: the crown smoothed flat and pinned opens the face and stays neat all day, while curls below the ears add width where the face narrows toward the chin. In photographs, the contrast between smooth top and curled lengths gives dimension a single texture never achieves — the difference between hair that looks “done” and hair that looks rich. Let curls cool 10 minutes before breaking them up; warm curls brushed out go frizzy, cool ones stay defined.
- Length: Medium or longer
- Hold: 6–8 hours
- Styling time: 30 minutes at home
- Face shapes: Heart, oblong — curls fill out a narrow chin
Ask your stylist for: “Half-up, half-down — top section from temple to temple, smoothed flat and pinned at the crown. Curl everything below the ears with a 32 mm iron, away from the face, and break the curls up soft, not ringlets.”
How to style it:
- Section the top half temple to temple, clip it up, and curl the bottom half with a 32 mm iron, all curls away from the face.
- Cool 10 minutes, then break the curls up with your fingers. Smooth the top section flat, twist once at the crown for grip, and pin with two crossed pairs.
- Mist lightly — the twist and the pins do the holding, not the spray.
Skip it if your hair is very fine and straight — the curls will drop within 2 hours. The waterfall braid (#11) holds better on fine hair.
Best for: Showing off long, healthy hair while keeping it off your face for the ceremony.
8. Half-up twisted halo
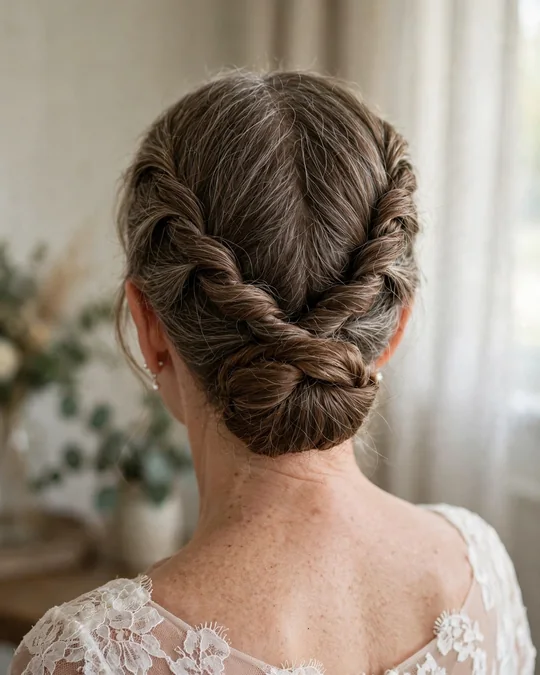
A single clip concentrates all pulling force at one spot — which is why half-up styles ache by evening. Two rope twists from the temples, meeting and pinned at the back, spread tension evenly around the head: no single point carries the load, so nothing drags. The twists sit across the crown, adding 2 to 3 cm of height where overhead wedding lighting flattens everything. It is the most comfortable secured style on this list.
- Length: Medium — 15 cm minimum
- Hold: 8 hours
- Styling time: 15 minutes at home
- Face shapes: All — crown height flatters every face
Ask your stylist for: “A half-up twisted halo — rope-twist a section from each temple and pin them together at the back of the crown. Keep the twists even and a little loose, with height at the crown, not flat.”
How to style it:
- Take a 5 cm section above each temple and rope-twist it — twist the section, then twist the two halves around each other — bringing both to the back of the crown.
- Cross one twist over the other, pin with two crossed pairs, tuck the ends under, and gently pull the twists wider for softness.
Skip it if your hair is shorter than 15 cm at the sides — the twists will not reach each other at the back.
Best for: Anyone who gets headaches from clips and elastics — comfort without sacrificing security.
9. Half-up with a pearl clip

Sometimes the accessory is the style. A pearl clip holds back the exact section you would otherwise fidget with all day, and gives the camera a focal point above the eye line — pearls photograph as soft white highlights, catching light like a good highlighter and drawing the eye upward. One well-chosen clip makes a simple half-up look deliberate: jewellery and engineering in one move. It is also the easiest of these mother of the bride hairstyles over 50 to do yourself on the morning — 10 minutes, with crossed pins underneath doing the real holding.
- Length: Medium or longer
- Hold: 6–8 hours
- Styling time: 10 minutes at home
- Face shapes: All — clip placement adjusts to any face
Ask your stylist for: “Half-up with the top section smoothed and pinned at the crown — I will add my own pearl clip. Backcomb the crown lightly first so the clip has grip, and use crossed pins under the clip, not the clip alone.”
How to style it:
- Backcomb a 3 cm section at the crown for grip, smooth the top layer over it, and gather the top half at the back of the crown.
- Secure with two crossed bobby pins first — the pins hold, the clip decorates.
- Fasten the pearl clip over the pins, slightly off-centre, and mist the crown lightly.
Skip it if your hair is very heavy and thick — one clip will not carry the weight; use the twisted halo (#8) for structure and the clip as decoration.
Best for: The DIY morning — the most occasion impact for the least effort.
Good to know
How many pins does a wedding style really need? More than you think: a secure updo uses 12 to 20 bobby pins, half-up styles 6 to 10. Buy two boxes — pins are cheap, and running out mid-style is not a problem you want. Pack an emergency kit in your clutch: travel hairspray, 10 spare pins, 3 clear elastics, blotting papers and your lipstick. If one section drops during the reception, you can re-pin it in the bathroom in 2 minutes and nobody will ever know.
10. Half-up smooth with lifted roots
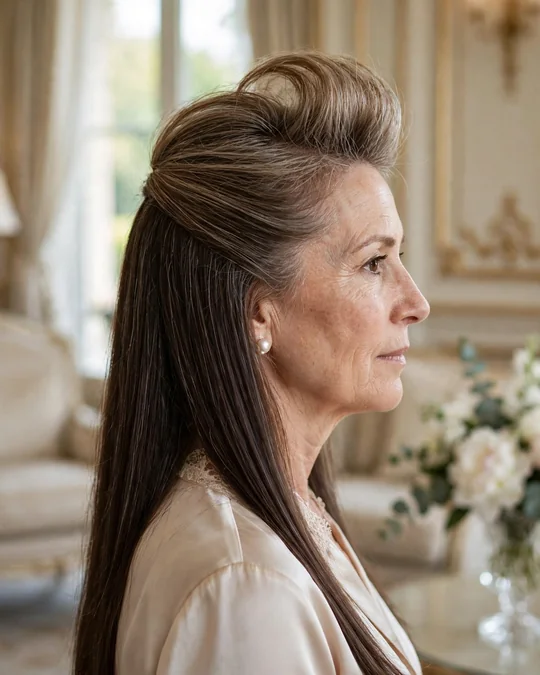
Root lift is the difference between hair that looks styled and hair that looks expensive. Lifted 2 to 3 cm off the scalp, the crown lets light under the hair and gains depth; flat roots make even fresh styling look tired by afternoon. The trick is directional and time-sensitive: blow-dry crown sections up and away from the part while 80 percent dry, when the bonds are still resetting. Once hair is fully dry, no teasing recreates that lift. One flat-iron pass over the lengths gives the sleek finish.
- Length: Medium — best on straight to wavy hair
- Hold: 6 hours
- Styling time: 25 minutes at home
- Face shapes: Oval, round — the lift lengthens the face
Ask your stylist for: “Half-up, very smooth — blow the crown up and away from the part for real root lift, then pin the top section flat at the crown. Sleek and formal, with the lift doing the work, not backcombing.”
How to style it:
- Apply a golf-ball-sized amount of volumising mousse to damp crown roots only — product on the lengths weighs them down.
- Blow-dry crown sections upward with a round brush while 80 percent dry, over-directing each section away from the part.
- Once fully dry, smooth the top half back with a boar brush and pin flat at the crown with crossed pairs.
- Run a flat iron over the lengths once for the sleek finish, and mist with a light flexible spray.
Skip it if your hair is curly — fighting curl into sleekness takes an hour and humidity wins. Work with the curl: the soft-curls half-up (#7) is your style.
Best for: Formal evening weddings where the dress code is black-tie and the hair should match the polish.
11. Half-up waterfall braid

A volume illusion built for fine hair. A standard braid compresses and can make fine hair look thinner; the waterfall drops a new section through at every crossover instead of folding it in, so strands hang loose below the braid line. The result looks like the fullness of curls with the grip of a braid — and because the braid anchors across the crown, it holds 8 hours on hair that drops ordinary curls in two. If fine hair defeats every curled style, this is the structural answer.
- Length: Medium — needs 15 cm to braid across
- Hold: 8 hours
- Styling time: 20 minutes at home once practised
- Face shapes: All — falling strands soften every face
Ask your stylist for: “A half-up waterfall braid across the crown — from one temple to the other, dropping sections through so the lengths fall loose. Keep it a little loose and romantic, not tight, and pin the end under the hair.”
How to style it:
- Start a three-strand braid at one temple; at each crossover, drop the bottom strand and pick up a new section from just below it — that dropped strand is the “waterfall”.
- Work across the crown to the far temple, keeping the braid loose, then pin the tail flat under the hair and hide the pins.
Skip it if your hair is very short at the sides — you need 15 cm of side hair to carry the braid across the crown.
Best for: Fine hair that will not hold a curl — the romantic look with an 8-hour guarantee.
Worn down and polished
Hair worn down only works when it looks intentional — glossy, shaped and controlled. These four styles are built for indoor venues and calm weather, where nothing will undo the polish.
12. Glossy Hollywood waves

Gloss is physics: every wave rolled in the same direction forms one continuous S-curve, and light reflects off it in an unbroken sheet — the eye reads that as shine, and shine reads as healthy, younger hair. The technique is counterintuitive: curl tight ringlets, let them cool completely, then brush out with a boar-bristle brush. The brushing converts separate curls into one flowing wave. Skip the cooling and it collapses into frizz. Strictly an indoor-venue style — humidity is the enemy.
- Length: Medium to long — 20 cm for the wave to form
- Hold: 5–6 hours
- Styling time: 45 minutes in the salon
- Face shapes: All — waves flatter every face
Ask your stylist for: “Hollywood waves — every section curled the same direction with a 32 mm iron, pinned to cool 10 minutes, then brushed out with a boar brush into one smooth wave. Shine serum on the ends, not oil. Shine, not wet-look.”
How to style it:
- Curl every section the same direction with a 32 mm iron, and pin each curl to the head to cool — cooling sets the shape.
- After 10 minutes, release the pins and brush through with a boar-bristle brush in long strokes until the ringlets merge into waves.
- Smooth a pea-sized amount of shine serum over the mid-lengths and ends only — serum at the roots kills volume.
- Set a deep side part and mist once with flexible hold, 25 cm away.
Skip it if the wedding is outdoors or humid — waves are the first casualty of moisture.
Best for: Evening weddings — nothing photographs like glossy waves under ballroom light.
13. Smooth blow-out with flicked ends
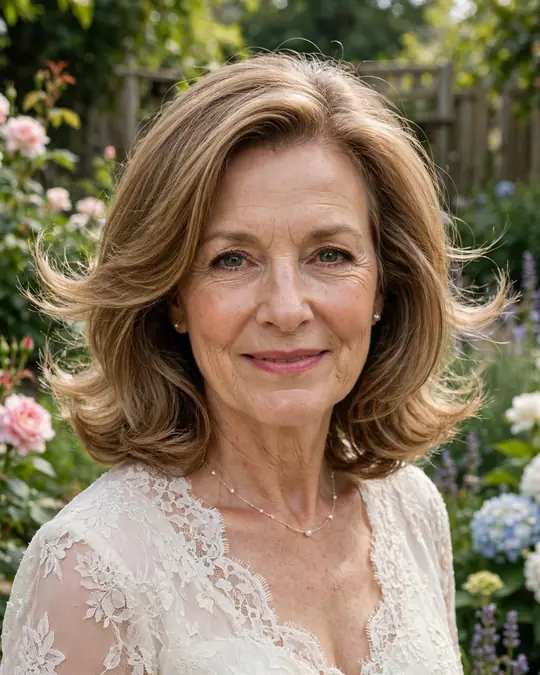
The flick is a balancing act: ends turned outward widen the silhouette below the chin, counterbalancing a narrow jaw or long face. The smooth part matters equally — a tension blow-dry, round brush pulling each section taut while heat follows, seals the cuticle flat, and a sealed cuticle resists frizz for 4 to 6 hours. Without the tension you just have a blow-dry that gives up by the speeches. Get a 2 cm trim first if ends are split: a flick draws the eye straight to them.
- Length: Medium — chin to shoulder
- Hold: 4–6 hours
- Styling time: 30 minutes at home
- Face shapes: Oblong, heart — the flick widens a narrow lower face
Ask your stylist for: “A smooth blow-out with the ends flicked out — tension-dry it really smooth first, then flip just the last 5 cm outward with the round brush. Noticeable, not 1960s.”
How to style it:
- Rough-dry to 80 percent, then tension-dry section by section with a large round brush, pulling each section taut — the pull seals the cuticle.
- On the last pass, roll just the final 5 cm outward over the brush, holding the heat 5 seconds per section.
- Let everything cool, run your fingers through once — no brushing, which flattens the flick — and mist lightly.
Skip it if your ends are very damaged — a flick draws the eye straight to them. Trim 2 cm first.
Best for: Daytime weddings — polish that reads as excellent hair rather than occasion hair.
14. Side-swept soft waves
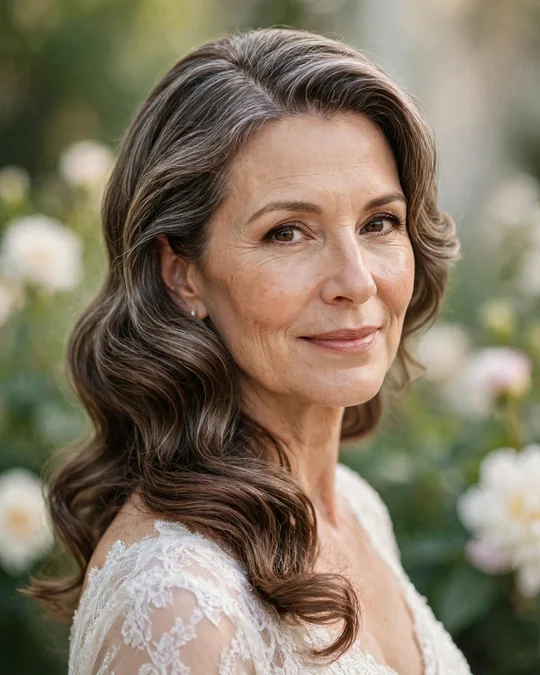
Sweeping everything over one shoulder solves two problems: it keeps hair off a detailed neckline — nothing ruins a beaded bodice photo like snagged hair — and puts all the volume on the camera side. In three-quarter shots the swept side shows full, glossy waves while the other stays neat and tucked. A deep 5 cm side part adds forehead height so the style never looks flat on top. Sweep toward your better side; tuck the other side behind the ear.
- Length: Medium to long
- Hold: 5 hours
- Styling time: 25 minutes at home
- Face shapes: All — sweep toward your better side
Ask your stylist for: “Soft waves swept over one shoulder — deep 5 cm side part, waves curled away from the face, everything brought to my left shoulder and pinned underneath. Tuck the other side behind my ear.”
How to style it:
- Make a deep side part and curl everything away from the face with a 32 mm iron; break the curls up with your fingers.
- Sweep all the hair over one shoulder, pin two crossed pins underneath at the nape on the empty side, and tuck the near side behind your ear.
Skip it if your dress has an embellished shoulder on the sweep side — hair plus beading on one shoulder is too much.
Best for: Detailed necklines and strapless dresses, where hair must stay clear of the dress’s best feature.
15. Long layers with a deep side part
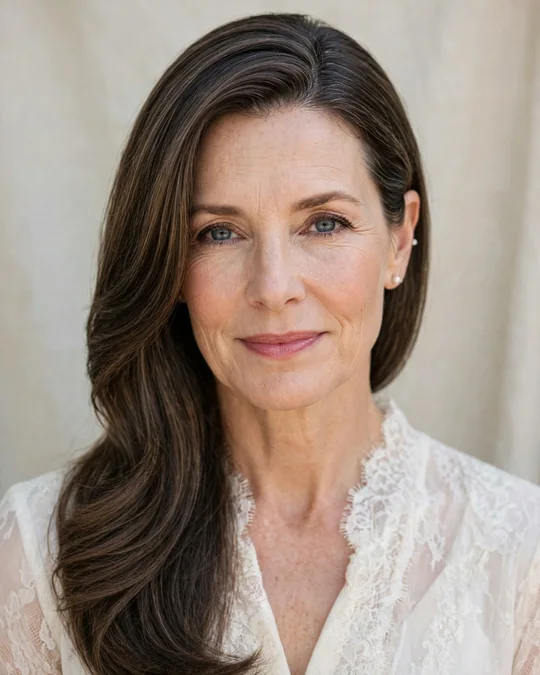
Long layers are a weight-management system: bulk removed from the perimeter lets hair lie flat at the crown — no triangle, no jaw bulk — and fall clean past the shoulders. The deep side part does the styling work, shifting 5 cm off centre to break facial symmetry; the brain reads asymmetry as youth in a way it never does with a centre part. The cut does the work, so styling barely has to: 15 minutes, a paddle brush, a pea-sized amount of serum on the ends.
- Length: Long — past the shoulders
- Hold: All day — it is the cut, not the styling
- Styling time: 15 minutes at home
- Face shapes: All — the deep part flatters every face
Ask your stylist for: “Long layers — keep all the length, just remove the bulk from the perimeter so it lies flat at the crown. Nothing above the collarbone. Then a deep 5 cm side part.”
How to style it:
- Blow-dry with a paddle brush, directing the hair down and smooth — the layers fall into place on their own.
- Set the deep side part while the hair is still warm, tuck one side behind the ear, and run serum through the ends.
- If the crown needs it, backcomb one 2 cm section at the part for a whisper of lift.
Skip it if your hair is very fine — long layers can look sparse at the ends. A blunt perimeter (see #3) keeps fine hair denser.
Best for: Genuinely good long hair — look like yourself, only better.
Short hair, dressed up
Short hair does not need length to look like an occasion — it needs finish. These three take a pixie, a bob and a crop from everyday to wedding with one deliberate move each.
16. Pixie polished with a jewelled clip
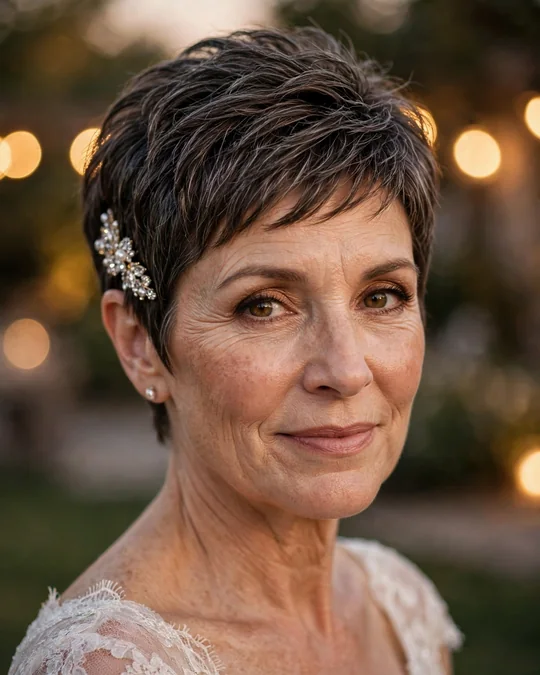
A pixie is already a strong shape; finish and one focal point make it occasion. Polishing wax — a pea-sized amount warmed between the palms — worked through dry hair defines each textured piece so the cut looks deliberate, not air-dried. Then the clip: placed just above the ear on the heavier side of the part, a jewelled clip catches light at cheekbone height, drawing the eye up and lifting the face in photos. One 30-second move turns the shortest cut here into one of the most dressed-up mother of the bride hairstyles over 50.
- Length: Short — pixie
- Hold: All day
- Styling time: 10 minutes at home
- Face shapes: Oval, heart — the clip balances a wider forehead
Ask your stylist for: “A clean pixie with textured ends — point-cut, not blunt. I will wear it polished with a jewelled clip above the ear, so keep the clip side neat and close.”
How to style it:
- Warm a pea-sized amount of polishing wax between your palms and work it through dry hair, piece by piece, defining the texture.
- Fasten the jewelled clip just above the ear on the heavier side of your part, and press flyaways flat with the leftover wax.
Skip it if your pixie is very newly cut and still settling — fresh short hair sticks out unpredictably; give it a week.
Best for: Pixie wearers wanting maximum impact with minimum morning effort — ten minutes, one clip, done.
17. Bob tucked and waved
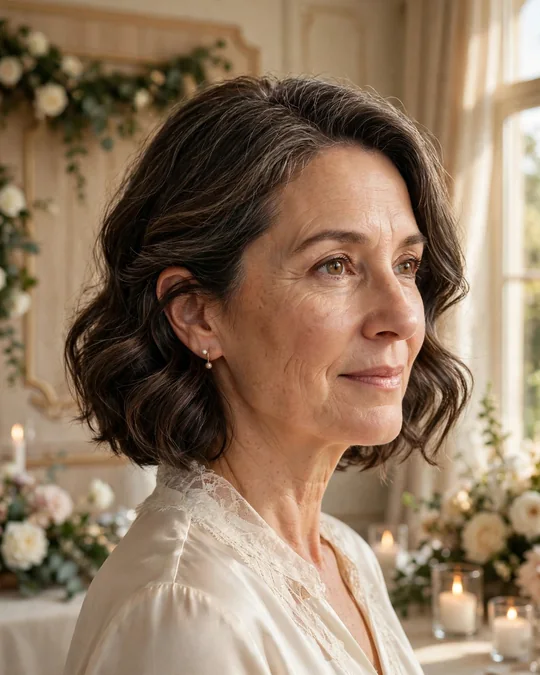
A blunt bob can photograph as a helmet — one solid shape, no movement. Two moves fix it: tuck one side behind the ear and wave the lengths loosely. The tuck breaks symmetry and shows an earring — free jewellery in every photo — while waves give the blunt perimeter movement so light plays across it instead of hitting one flat surface. An off-centre tuck reads modern and youthful where a perfectly even bob can read severe.
- Length: Short to medium — chin to shoulder bob
- Hold: 6–8 hours
- Styling time: 20 minutes at home
- Face shapes: All — tuck toward your better side
Ask your stylist for: “Keep my bob blunt — no thinning. I want to wear it tucked on one side and waved, so cut the tucked side clean enough to sit behind my ear without puffing out.”
How to style it:
- Wave the whole bob with a 25 mm iron, alternating directions, and break the waves up with your fingers.
- Tuck one side neatly behind the ear and pin flat with two crossed pins hidden under the hair.
- Pull a 1 cm face-framing piece loose on the tucked side so the tuck looks deliberate, and mist lightly.
Skip it if your bob is shorter than chin length — there is not enough length to tuck cleanly.
Best for: Statement earrings, and bob wearers wanting their everyday cut to look like an event.
18. Short crop with soft finger waves
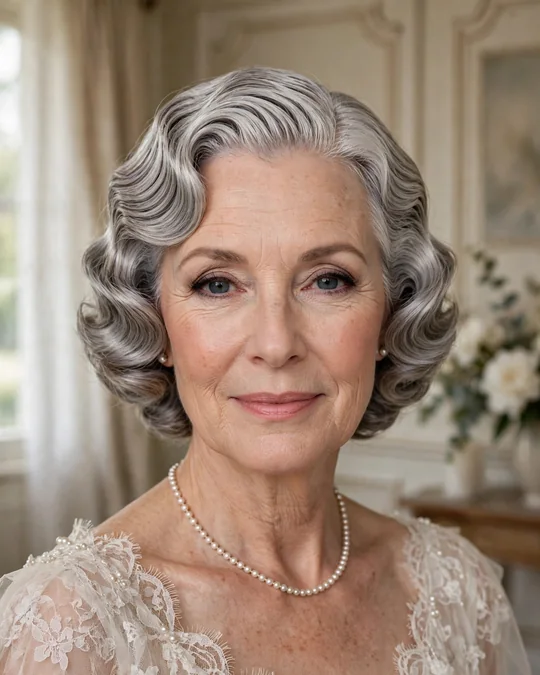
Finger waves are ornament for short hair: sculpted S-curves add width and interest without a millimetre of length, and the ridges catch light like jewellery. On grey or silver hair the effect is striking — the waves turn the colour into the feature. It is the most vintage-glamorous style here and paradoxically the most secure: set waves do not move until washed out. It needs real gel to set, so skip it if you dislike product feel.
- Length: Short — crop, 5–10 cm on top
- Hold: All day — set waves do not move
- Styling time: 40 minutes in the salon (needs setting time)
- Face shapes: Oval, heart — the waves add flattering width
Ask your stylist for: “Soft finger waves on my crop — sculpted with gel and a comb, not iron curls. Real 1920s-style ridges, set and dried. Soft, not crispy.”
How to style it:
- Work a generous amount of strong-hold gel through damp hair — it must be thoroughly wet for the ridges to form.
- With a fine-tooth comb, sculpt S-shaped ridges across the top and sides, pushing the hair forward and back in alternating waves.
- Clip each ridge with a wave or duckbill clip to hold the shape while it sets.
- Dry fully — 20 minutes under a hooded dryer — then remove the clips and mist once. Do not brush.
Skip it if you dislike the feeling of product in your hair — finger waves need real gel, and it stays in until you wash it out.
Best for: Silver and grey crops, and a style guaranteed identical in the last photo and the first.
Wedding-day hair rules that save every style
Whatever style you choose, these are the rules that separate hair that lasts from hair that gives up by the speeches.
- Wash your hair the night before, not the morning of. Day-old hair has more grip — freshly washed hair is slippery and needs twice the product to hold a pin.
- Do your hair before your dress goes on, wearing a button-down shirt. Pulling a dress over a finished style is how updos die.
- Cross your pins — two bobby pins in an X hold three times better than one. Match them to your hair colour and they disappear.
- Photograph the finished style from the back before you leave. You will never see the back of your own head all day, but the photographer will.
- Keep your hands off your hair. Touching and smoothing are what dismantle a style — once it is set, leave it alone.
- Give a bridesmaid your emergency kit (travel spray, 10 pins, 3 clear elastics). You will be too busy being hugged to carry it.
The wedding-morning routine:
- Style your hair first, calm and unhurried — 60 to 90 minutes before you need to dress.
- Mist once from 25 cm and do not touch it again. Put the pins and spray in the emergency kit, out of reach.
- Get dressed, then check the back with a hand mirror and your phone camera — fix now, not at the venue.
- Take one “before” photo in daylight. If anything drops later, you will know exactly what it should look like when you re-pin it.
The bottom line
If I had to pick one, it would be the low twisted chignon (#1). It holds 8 to 10 hours on every hair type, flatters every face shape, works with every neckline, and never looks like it is trying too hard. It is the style I would trust on the longest, most emotional, most photographed day — because it is the one you will never have to think about.
Pin this guide to your wedding board now, and when the trial appointment comes round you will walk in knowing exactly what to ask for.
Frequently asked questions
How far ahead should I book my hair trial?
Six to eight weeks before the wedding — close enough that your haircut is the one you will have, far enough to re-book if you hate it. Bring a photo of your dress neckline and the actual accessories. Then wear the trial style for 4 hours at home: if pins slip or your scalp aches, you want to know now, not on the morning.
Will an updo make me look older?
Only if it is scraped tight and shellacked. A soft updo — loose pinning, crown height, softened front pieces — lifts the face and photographs as elegant. Severity and stiffness age; the updo itself does not. If you are worried, choose the loose romantic updo (#4) and ask for softness, not sleekness.
What if it rains on the wedding day?
Agree a wet-weather plan at your trial. If the forecast turns, switch from worn-down to pinned: the braided crown (#5) and low twisted chignon (#1) are the most weatherproof here, because structure holds the hair, not product. Keep a travel umbrella in the car and a silk scarf in your bag — 5 minutes under a scarf between venues saves an hour of styling.
My fine hair slips out of every style — which mother of the bride hairstyles over 50 actually stay put?
The braided crown (#5) first — braids self-lock and spread weight around the head, so fine hair cannot slide out. Second: the low twisted chignon (#1) with a pea-sized amount of texturising powder at the roots before styling. Avoid heavy smooth styles on fine hair — they have nothing to grip.
Can I wear a fascinator or hair clip if I wear glasses?
Yes, with placement discipline: keep it above the temple line and 3 cm from the frame, so adjusting your glasses never shifts it. Smaller is better with glasses — a jewelled clip (#16) or single pearl clip (#9) reads intentional where a large fascinator plus frames looks busy. Trial the exact combination, glasses on.
Should my hairstyle match the bridesmaids’?
Coordinate, do not match. If bridesmaids wear sleek low buns, your soft textured updo looks related but distinct — exactly right, since you are not a bridesmaid. One rule: never out-elaborate the bride. Ask your daughter what she is doing and choose one step simpler.